
Constipation is more common than you think. “4 million people in the United States have frequent constipation,” says a report by the Department of Medicine, Milwaukee. If you suffer from constipation frequently, there is good news for you.
Non-medical interventions like yoga can stimulate your body’s own healing process. You don’t necessarily need to use pharmaceutical drugs to treat constipation.
Yoga for constipation can restore your gut health in a matter of days. There are a few yoga poses and moves you need to perform correctly, so your body slows down the process of absorption of water from the food you eat.
There is no magic pill to make this happen. In this post, I have shared some tried and tested yoga poses to free you from an upset stomach. You can add them to your regular workout routine. You will feel the difference right away.
Here Are the Best Yoga Positions and Moves For Fast Relief From Constipation
1) The Locust Pose – Salabhasana

The Locust Pose is one of the foundational poses of yoga. For someone new to yoga, it is also quite simple to perform. Performing this yoga move for constipation will also strengthen your core and help restore your vitality. To get started, all you need is a good yoga mat and some comfortable clothes to put on.
Step 1: Start with the tabletop position
- Begin this move by getting into a tabletop position.
- Make sure your core is tight, and you are breathing without any hindrance.
Step 2: Lie on the stomach
- Next, lie down on your stomach with your palms facing downwards.
- Let your chin be elevated–about an inch above from the floor.
- Keep your arms in front.
- Try to feel the sensations within your legs, buttocks, and hips, so you have total control over your lower body.
Step 3: Lift your upper-body
- Further, slowly increase the distance between your chin and the floor.
- Lift your upper and lower body hinging on the hips.
- As you lift your head and legs, raise your palms while still facing downwards.
- Hold this pose for 30 seconds and then relax.
- Repeat this routine 4-5 times per session.
2) The Head-To-Knee Pose – Janu Sirsasana
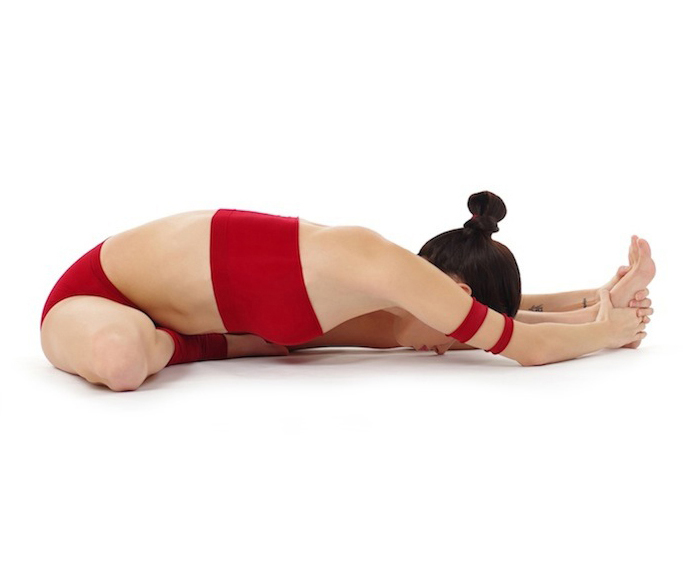
The Head-To-Knee Pose, or as called in Sanskrit, Janu Sirsasana, is performed in a seated position.
Step 1: Sit upright
- To get started, sit upright on a yoga mat with your left leg flexed and right knee bend at a 90-degree angle.
- The base of the right foot should touch the left inner thigh.
Step 2: Bend forward
- Next, slightly twist your upper body in the left direction so your arms can be placed on the left thigh.
- Slowly bend forward until your arms touch the left ankle.
- Hold the base of the left ankle with both your arms.
- Bend even further until the tips of your nose is in touching distance from the floor (as you can see in the above image).
- Hold this position for 30 seconds and continue to breathe deeply.
Step 3: Get back to the default position
- After about 30 seconds, slowly come back to the default position.
- Sit with your spine erect and shoulders wide apart.
- Rest for 15-20 seconds and repeat this yoga pose for constipation at least five times per session.
- Make sure to switch legs after each set.
3) Supine Spinal Twist – Supta Matsyendrasana
Supine Spinal Twist or Supta Matsyendrasana is one of the best yoga poses for constipation. It is beginner-friendly. To perform this move, you don’t need any proper experience with yoga.
According to YogaPedia, the Sanskrit name Supta Matsyendrasana suggests a spinal posture created by Matsyendra, a yogi and a devotee of Hindu god Shiva.
Step 1: Lie on the floor
Supine Spinal Twist is to be performed while lying on the floor or a yoga mat.
- Once you get in this position, make sure you are staring straight at the ceiling.
- Keep your shoulders apart–the back of your shoulders should be touching the floor or the mat.
- Lastly, place your arms at the side of your torso.
Step 2: Place your right leg outside of your left leg
First, we will begin working on the right side of your spine.
- Bend your right knee and place the same foot outside of your left leg. To give your spine a good twist, it is essential to get this step right.
- If you feel pain in your hips or ankle, do not go ahead with this routine.
Step 3: Bend your right knee towards the left side of your body
- Use your left hand to bend the right knee towards the left side of your body.
- Stretch it until the knee is in the touching distance with the floor or the mat.
- Hold this position for about 30 seconds and release.
- Get back to the default position.
- Repeat the same move with your left knee.
- You can perform this posture 4-5 times per session.
Also Read – Yoga Mats Buying Guide
4) Crescent Lunge Twist – Parivrtta Anjaneyasana
Crescent Lunge Twist or Parivrtta Anjaneyasana is one of the several variations of the basic lunge. Along with stretching your calves, ankles, thighs, and hips, it also helps you get a good twist in your abdominal area.
This variation of lunge works on both your upper and lower body. It also eases the pressure on your small intestines.
Step 1: Start with the downward-facing dog position
- To get into a downward-facing dog position, you need to begin with getting into a tabletop position first.
- Gently lift your knees and rest your entire body on your hands and legs.
- Lift your hips. Imagine a shoestring tied around your hips, lifting you.
Step 2: Lift your left leg up
- Next, while being in a downward-facing dog position, lift your left leg as if you are trying to touch the sky with your foot.
- Without pausing here, let the momentum drag the foot a little bit further than its default position.
- Now you are in a primary lunge position.
Step 3: Bring your palms in front of your heart
- Bring your palms together in front of your heart–in the namaste position– hold this position for about 5 seconds.
- Next, while keeping your palms in the same position, twist your upper body towards the left.
- Let your right elbow touch the left knee. Also, keep your shoulders back.
- Hold this position for 30 seconds.
- With every exhale, you will feel an even deeper stretch.
Step 4: Repeat with the right side of your body
- After holding the Crescent Lunge Twist for 30 seconds, get back to the tabletop position.
- Repeat the same with the right side of your body.
- Perform this yoga pose for constipation at least five times on each side.
Conclusion
It is always good to follow a non-medical treatment method to treat a physical condition like a stomach ache. However, you should also remember that no matter how well you perform yoga for constipation, you will have to address the root cause of the issue first.
Dehydration is always the primary cause of constipation. Hence, drink plenty of water and add fibrous food to your diet.